f1uxu5 is a live lightpainting app with fire/light juggling and flow arts in mind.
The idea is to use cheap components that you can setup at your convention, festival, fire space, training space or
at home.
f1uxu5 is running on a
Raspberry Pi and
uses the live video from the Raspberry Pi Camera Module
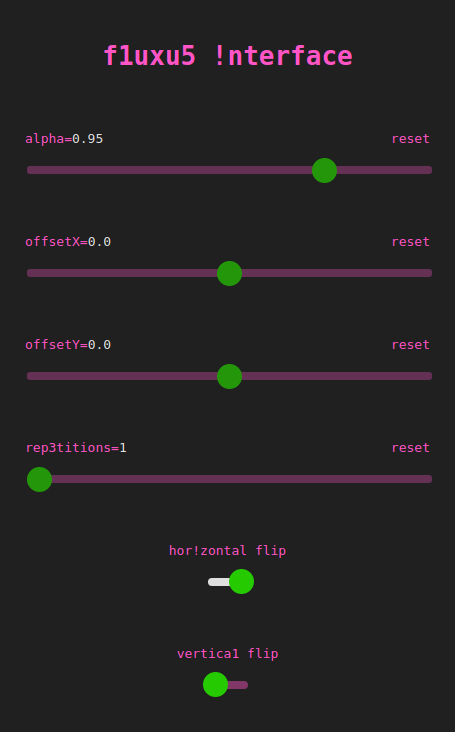
to compute an effect similar to long time exposure photography. It also features some variation of the effect. With f1uxu5 !nterface
you and your audience can control f1uxu5 over wifi using e.g. a smartphone.
Below you find a list of parts and instructions on how to setup and control f1uxu5.
I am interested in how and where f1uxu5 is used around the world. You are welcome to send me a notice of your convention, festival or other public display and its coordinates to
Aktivieren Sie JavaScript, um die E-Mail Adresse zu sehen | Enable JavaScript to display e-mail address
f1uxu5 is free of charge and open source.However, if you appreciate my work I don't mind to get a coffee or beer or some bucks in my hat at paypal.me/f1uxu5 , especially if you are using f1uxu5 commercially.
Parts
- Raspberry Pi 3B or higher
- Raspberry Pi Camera Module v2
- Micro SD Card (Class 10) 4GB Minimum
- 5V/2.5A power adapter with Micro USB connector
- Housing which supports the camera module or has a slot for the camera cable
- HDMI cable
- Projector or large screen
Setup
- Download the f1uxu5 image
- Unzip to get the image file (f1uxu5-1.0.img)
- Flash the image to the Micro SD card, e.g. using balenaEtcher . Find more details on how to install an operating system for Raspberry Pi at raspberrypi.org
- Put the Micro SD card in the card holder of your Raspberry Pi, connect your projector or display via HDMI and plug in your Micro USB power adapter
- Get your light toys and play!
Control
- Connect with your smartphone to the open WiFi (SSID is f1uxu5) that is hosted by the Raspberry Pi.
- Type http://f1uxu5.interface in your browser's address bar. In fact, anything that looks like a domain will do.
- Use the f1uxu5 !nterface website to control the f1uxu5 application running on the Raspberry Pi
Defaults
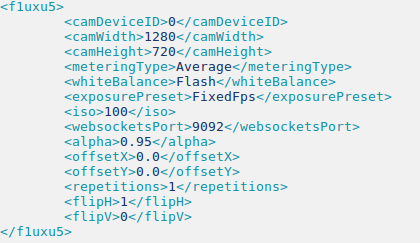
You may want to change default values and startup parameters of f1uxu5. Modify the file /home/pi/f1uxu5/bin/data/f1uxu5-settings.xml:
You find the file in the rootfs partition, when you insert the SD card in your computer. Note that if you are on Windows you need a program to read the Linux filesystem (EXT4) on the SD card. You can also log into your Raspberry Pi with the above credentials and then change the file.
You probably would like to adjust camHeight according to the aspect ratio of your display. The Raspberry Pi camera could provide FullHD resolution (1920x1080) at 30 frames per second.
Unfortunately, performance of a Raspberry Pi 3B is not good enough to process FullHD video in realtime, so I advise not increase resolution over camWidth=1280.
Don't set whiteBalance to Auto if you are light painting in the dark
as the changes in white balance will mess with your colors. If the light traces are too dark, you want to increase
Initial values can be set for alpha in the range of 0.8 to 1.0, offsetX and offsetY in the range of 0.0 to 1.0 and repetitions
to a decimal in the range 1 to 15. flipH and flipV should be 0 or 1.
Security
The password of the user pi is f1uxu5.pwd
To secure the f1uxu5 WiFi, you need to modify the file /etc/hostapd/hostapd.conf.
Uncomment the last couple of lines in the file and change the password:
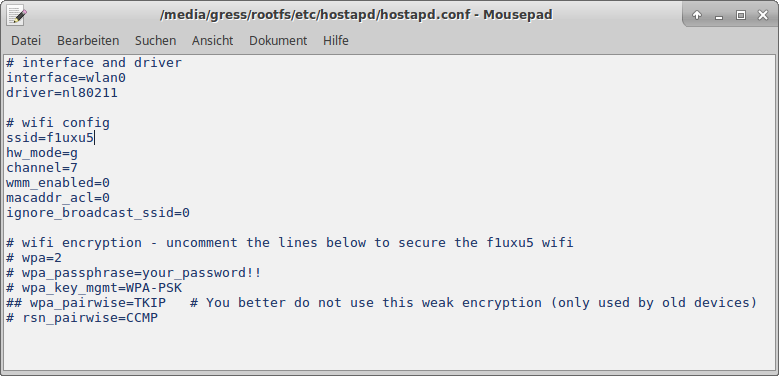
You find the file in the rootfs partition, when you insert the SD card in your computer. Note that if you are on Windows you need a program to read the Linux filesystem (EXT4) on the SD card. You can also log into your Raspberry Pi with the above credentials and then change the file.